Flexibility Hub: Starter guide
This tutorial is structured around a workflow defined with synthetic data. The data for this tutorial can be downloaded with scipion3 testdata --download FlexHub_Tutorials.
Note that the workflow tutorial focuses mostly on the way flexibility information can be analysed from CryoEM particle data. To that end, the Zernike3D algorithm will be used to exemplify the workflow. Nevertheless, steps that could be analyzed with a different software will be explicitly marked.
Apart from the particle workflow proposed, there exists other possibilities inside the Flexbility Hub to extract information from CryoEM maps and structural models as well. If you are interested on knowing more about all the functionalities in the Flexibility Hub, we propose reading the specific Plugin tutorials provided above.
Workflow tutorial
Some comments on the data to be used
In this tutorial, we will use a synthetic dataset generated with ContinuousFlex and its Normal Mode Analysis tools. The dataset includes the following items:
Synthetic particles: we will work with a total of 500 CTF corrupted synthetic particles with angular information and a box size of 64px. These particles were generated by NMA in order to add some continuous heterogeneity to the dataset.
Volume data: to be used as input for the Zernike3D programs.
Structural model: to be used to analyze conformational changes at atomic level.
In the case of working with particles, angular information and CTF are usually mandatory requirements. Therefore, flexibility analysis usually starts at a late state in a CryoEM workflow, once particles have been already refined, consensuated…
Where to find Flexibility Hub protocols?
Flexibility Hub related protocols have been grouped in a new View tab in the Scipion GUI called Flexibility Hub. In addition, it is possible to use the key Ctrl+F to open a protocol search dialog.
1. Importing the data in Scipion
The first step in our workflow is to import our particles, volumes, and structural models in Scipion.
Here we provide a tutorial for importing data inside Scipion. Below it is also provided the filled form to import our particles, which also includes the sampling rate that will be needed to import the map and mask.
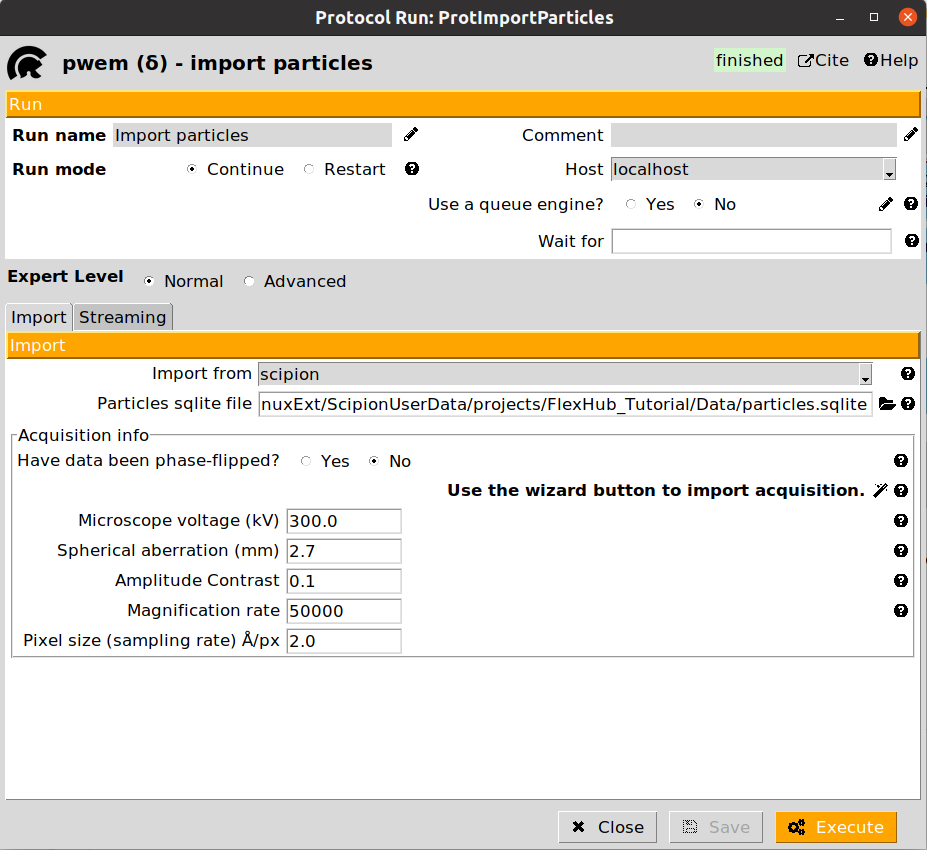
Once all the data has been imported, we are ready to start the flexibility analysis. Note that in a real project, the input data to the Flexibility Hub (particles, maps, models…) might come from different sources (imports, refinements, consensus…).
2. Zernike3Deep landscape estimation
Flexutils includes several Zernike3D programs able to estimate conformational landscapes from CryoEM particles. Among them, generally the best possible choice to start any analysis is the Zernike3Deep algorithm.
The Zernike3Deep method is a semi-classical neural network able to learn to produce meaningful Zernike3D coefficients compatible with the mathematical basis description. Therefore, it uses our own knowledge during the learning process, producing a results that is no longer a black box.
The Zernike3Deep pipeline is divided into two different protocols:
angular align - Zernike3Deep: Protocol responsible of training the Zernike3Deep network based on a set of input particles. In addition, it will also infer Zernike3D coefficients for those same particles.
predict - Zernike3Deep: Protocol to infer new Zernike3D coefficients from a previously trained Zernike3Deep network and a new set of particles.
In our workflow, we will exemplify the use of both protocols. Let’s start with the training of the Zernike3Deep network. An example of the form is provided below:
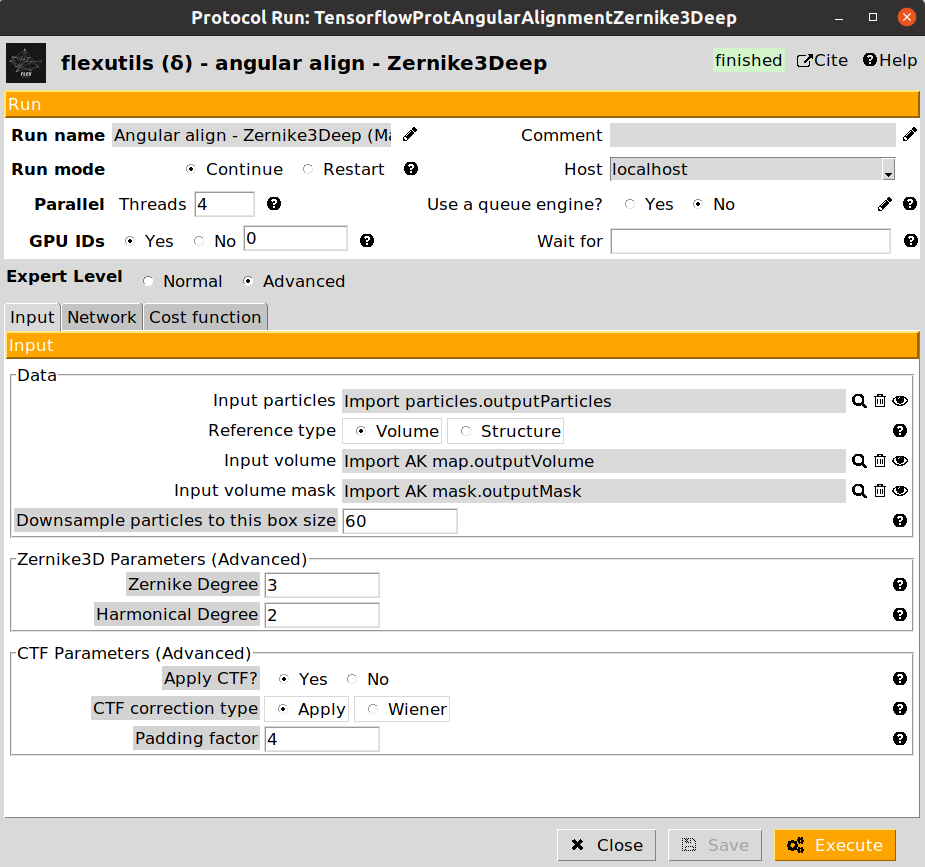
The form is subdivided into three different tabs (Input, Network, and Cost function). For this workflow, we provide below the parameters to be filled up:
- Input section
Input particles: Particles previously imported in the Scipion project
Reference type: Select Volume for this step
Input volume: The map previously imported in the Scipion project
Input mask: The mask previously imported in the Scipion project
- Network section
Number of training epochs: Increase it to 50 since we have a low number of particles
Cost function section (leave as default)
Once filled up, you can click on the Execute button to start tranining the Zernike3Deep network. Once it finishes, you should see an output of type SetOfParticlesFlex on the Summary Scipion tab. The output particles will include all the information stored in the input ones, as well as the conformational landscape information estimated by the network.
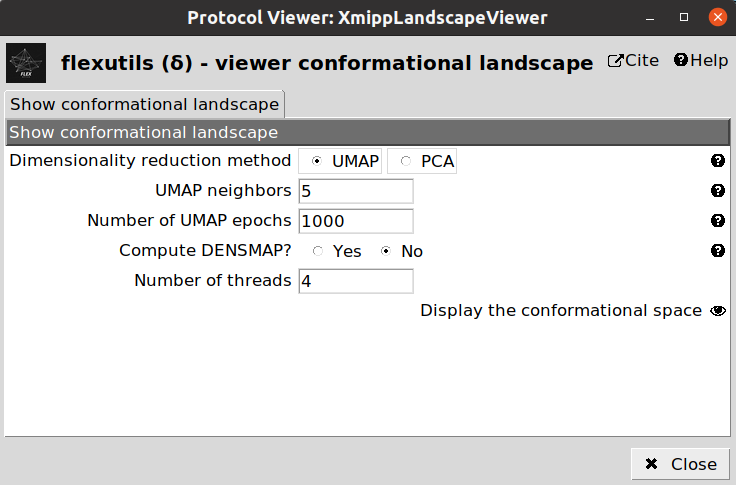
One way to check the initial shape of our landscape is to use the Flexutils visualization tools. At the current step, we can visualize the estimated landscape by clicking on  . You should see a form like this:
3. Landscape dimensionality reduction
Since the landscape estimated from the Zernike3Deep network have a large number of dimensions, we need to reduce them to a number that we can handle (usually, 2D or 3D). To that end, we can apply the dimensionality reduction protocol from Flexutils to get a meaningful representation base on different methods.
Currently, the methods included are the following:
PCA: Dimensionality reduction based on Principal Components Analysis. This linear method is very popular, but the representation obtained is usually not very informative unless states are well separated.
UMAP: Non-linear dimensionality reduction method. UMAP landscapes are usually more informative than PCA, although in some cases it might lead to some artefactual generated regions.
DeepElastic: Non-linear dimensionality reduction based on elastic analysis of clusters. it usually gives results in the middle between PCA and UMAP.
Since the dimensionality reduction is fast, we recommend running the three methods, and use the  button to check which provides a better representation for a given dataset. Note that the
  is currenly implemented only for 3D spaces.
We provide below some images of the forms filled to run any of the different dimensionality reduction methods for the tutorial dataset:
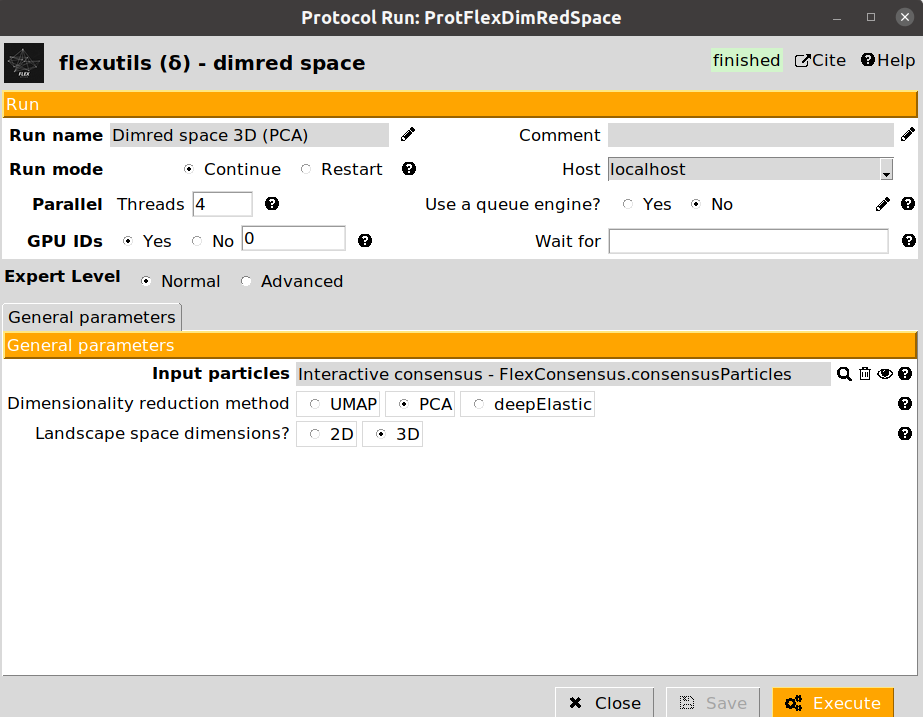
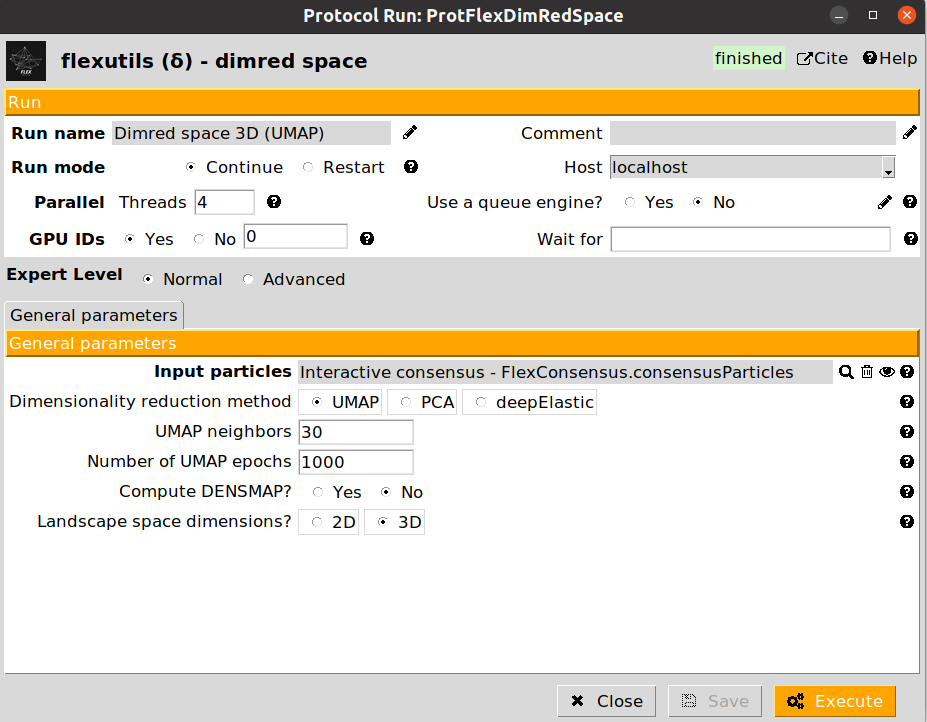
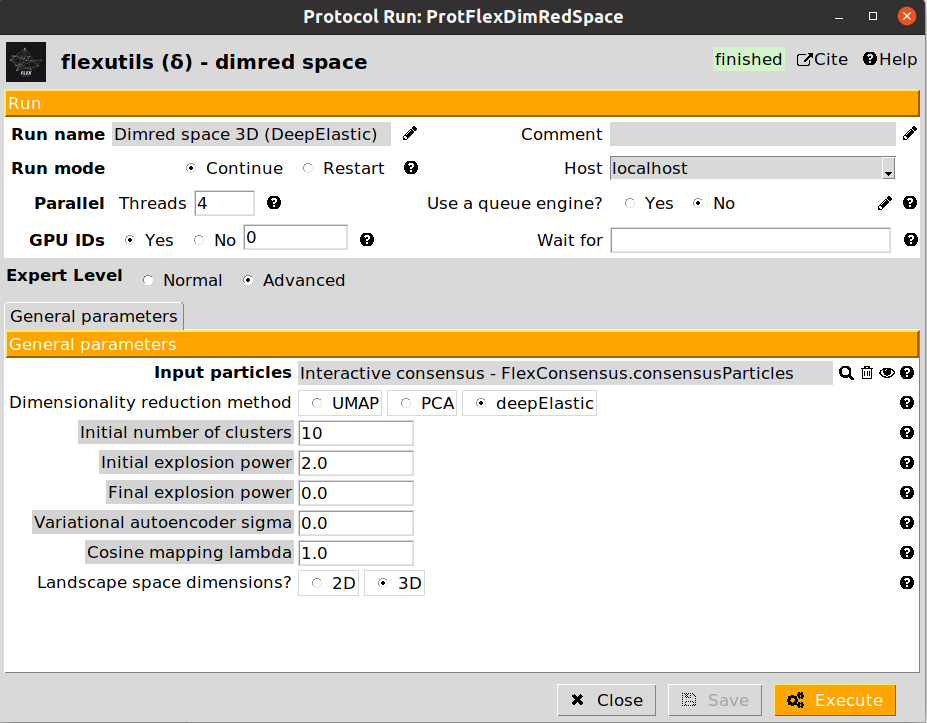
Since our data comes from synthetic data, we have a well define landscape shape. Ideally, the landscape we are looking for should be an exact straight line. Therefore, PCA should give better results for this case, as the relationship among different states is completely linear (and can be represented exactly by two PCA components).
4. Interactive landscape clustering
Once the Zernike3D landscape has been reduced, it is possible to use the interactive tools implemented in Flexutils to explore the different states found by the Zernike3Deep algortihm.
Flexutils interactive tools has been developed for both, 2D and 3D spaces, and include two different ways to explore the data:
- Cluster space (only for 3D spaces): Interactive clustering of flexibility spaces based on KMeans. The tools provides two visualization windows:
Left panel: 3D visualization of the point cloud representing the conformational landscape of the molecule
Right panel: Map visualization obtained from a selected cluster
The space can be clustered as many times as needed, based on the number of clusters specified in the corresponding field in the right panel. Once clustered, it is possible to click on any of the cluster representatives (white dots) in the left panel to get a real time representation of the map coming from that specific point. In addition, the viewer provides a shortcut to view the map representatives in ChimeraX for advanced visualization of the conformational states. * Annotate space (for 2D and 3D spaces): Provides and interactive way to explore any region from a given conformational landscape. Therefore, it is possible to click anywhere in the landscape view to get in real time the conformational state corresponding to the selected landscape region. Similarly to the previous tool, there exists a shortcut to ChimeraX for advanced visualization.
Video tutorials explaining the usage of the different tools are available here. We recommend watching these videos at this point before doing your first landscape exploration.
We provide below the filled form of the Cluster space protocol as an example:
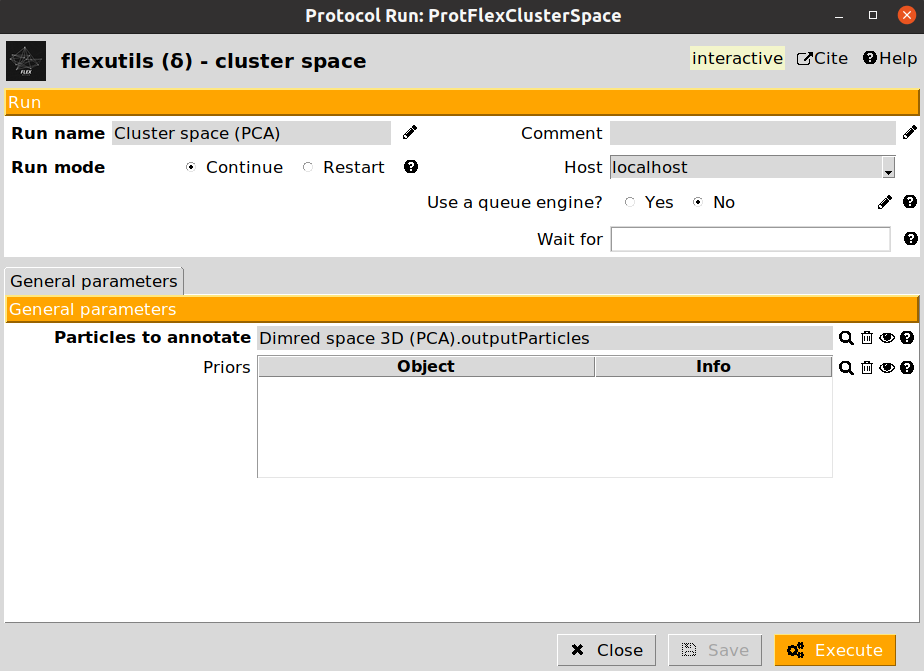
In this case, the form only requires as input a set of particles coming from a dimensionality reduction protocol. Since Cluster space is only implemented for 3D spaces, the protocol will validate before executing whether the reduced space stored in the particle set has the appropriate dimensions.
Both, Cluster space and Annotate space protocols will register inside Scipion a set of classes (with flexibility information) based on your saved annotation. The set of classes provides a very convenient way to store the information extracted from the lanscape. By clicking on  you will be able to:
Inspect the set of classes information (representatives, particles associated with each representative, flexibility information…)
Create a subset of new classes
Create a subset of representatives (useful to further analyze states from the flexibility information stored)
Create a subset of particles associated with a given representative (useful to refine a given state)
Let’s extract the representatives of the classes using with  button. Thanks to this extraction, it will be possible to further analyze the Zernike3D coefficients to extract the conformational states of the representatives and get more information about the motions suffered by the protein.
5. Applying deformation fields
If we try to open any of the representative volumes extracted from the set of classes generated in the previous step, we will see that all the maps are identical to the reference volume we imported at the beginning of the workflow. Instead, the Zernike3D programs (and other programs estimating motions based on deformation fields) provide several tools to continue analyzing flexibility information, being one of those tools the application of the estimated deformation fields to approximate a new conformational state.
The protocol apply deformation field - Zernike3D is the one responsible for this task. The protocol form will ask for a set of volumes with Zernike3D flexibility information stored. The Zernike3D flexibility information will be used to restore an estimated deformation field to be warped to yield a new state.
In addition, the protocol allows to provide an atomic structure (that should be ideally traced, or at least aligned against the reference map used during the Zernike3D estimations). If provided, it will be possible to get the new state as a structural model instead of as a density map.
By clicking on  , it is possible to inspect in different ways the new states (either at map or structural model level). Two of the options provided include seeing a strain or rotation color map computed from the estimated deformation fields. The strain/rotation maps summarize the information about the forces suffered by the protein when transition from the reference state to the new state we have just estimated:
Strain map: Summarizes the compression/stretching forces
Rotation map: Summarized the rotational forces
6. Workflow summary
Here finishes the Flexibility Hub starter guide!
Below we provide an example of the workflow we have defined along the tutorial. The complete template workflow is available inside the scipion-em-flexutils plugin, inside the templates folder (the path to your template in your system should be : path/to/scipion-em-flexutils/flextuils/templates/starter_guide.json). To load the template, you can use the following command: scipion3 template path/to/scipion-em-flexutils/flextuils/templates/starter_guide.json.
We also recommend moving to the advanced guide to continue learning about the Flexibility Hub strategies when dealing with experimental data.
