Streaming workflows
Scipion can launch streaming workflows in several ways. The most basic one is creating an empty project to start a new workflow with an Import Movies protocol pointing to the microscope’s deposition directory. Since we want to process the movies that are currently located at that directory, but also those movies that are continuously arriving, we must activate the streaming mode in the streaming tab, as shown in the figure below. Afterwards, the rest of the protocols can be added to the workflow in the same way that in the non streaming workflows (from the protocols tree at left of finding them with ctrl+F), but now all the protocols will wait for new data to process, resulting in a whole pipeline processing data on-the-fly.

The two main parameters associated to the streaming mode are:
Timeout: The time to wait, after not receiving new images, to close the acquisition.
File timeout: Scipion is checking if a new file is growing up. If it do not change after this time, Scipion will consider it is ready to be imported.
Usually the general timeout is a huge value (43,200 seconds = 12 hours) in order to prevent ending the acquisition in an eventual acquisition issue at the microscope side. In other words, this is the time you have to resume the acquisition after an eventual pause.
Finally, when the acquisition is finished, you can manually stop the on-line processing, by selecting the Import Movies > right-click > STOP STREAMING. Then, all protocols will finish as soon as all the last data is processed.
As any Scipion project, the project directory is stored at
$SCIPION_USER_DATA/projects/myAcquisitionProject
(where $SCIPION_USER_DATA is ~/ScipionUserData by default and
myAcquisitionProject is the project name in this case).
The Scipion projects are self contained directories.
Thus, one can export/import a project which has started in
the facility computer to his/her own computer, just by coping the
project-directory to his/her own $SCIPION_USER_DATA/projects.
Take into account that the project directory does NOT contain
the raw movies by default (to save disk space).
However, this behavior can be modified in the Import Movies protocol.
The procedure of creating manual workflows by adding every protocol to use (described above) might be tedious for a facility, where the same workflow will be usually employed for most of the acquisitions (or a few of different workflows). For this reason, Scipion is able to automatically launch templates by means of (at least) 4 ways:
Launching static templates.
Launching dynamic templates.
Launching dynamic templates from command line.
Launching Python scripts using the Scipion’s API.
Static templates
Firstly, you can design a workflow by using Scipion GUI as usual by adding an import, attaching some processing protocols, including the summary monitor… (like described in the previous section. Then, when you are happy with your workflow, you can export it by selecting all protocols you want to export (ctrl+click to select more than one) and clicking the Export button at top (see in the middle of the screenshot below). This let you saving it as a template (a JSON file) at any directory on your system.

Additionally, Scipion has a public workflows repository at http://workflows.scipion.i2pc.es, where the workflows are classified in different categories, such as Data Collection, 2D classification, 3D classification, Model Building… If you click on a certain workflow, you can see a preview of that workflow. Use the mouse-wheel to zoom in/out, click and drag in an empty zone to move and click on a box/protocol to inspect the internal parameters. You can download a certain workflow to any directory on you system. In addition, anybody can upload workflows (without any login) by selecting all the protocols in the Scipion’s project and by clicking Export & Upload.
In order to launch any template (as described above: downloaded or made by yourself), open Scipion and create an empty project. Then, you can import the workflow with Project > Import Workflow at the top menu bar and browsing to where the template is stored/downloaded (Scipion’s templates are JSON files). Therefore, the workflow is loaded to the project as saved protocols. At this point, you can check/modify any parameter of a certain protocol by opening the protocol form by right-click > Edit or double-click. When you are happy with all the parameters, store the protocol by clicking Save (do not click Execute/Schedule). When you are happy with all protocols, select the Import protocol, right-click > Restart workflow. Then, the Import should start to import data and the rest of the protocols should change to the Schedule mode. Scheduled protocols wait for ready inputs, i.e. when all inputs become ready to a certain protocol, that protocol should automatically start to process the incoming data (changing to the Running mode).
If, for some reason, a protocol remains in scheduled mode even all inputs seem ready, you can monitor the reason why still scheduled by right click > browse > Logs > schedule.log > double click. That text log lists the reasons will keeping scheduled, then go to the bottom to check the most resent steps.
Alternatively to the GUI, Scipion is able to launch JSON templates from the command line as follow
scipion3 python -m pyworkflow.project.scripts.create "myAcquisition" "/path/to/your/workflow.json"
scipion3 python -m pyworkflow.project.scripts.schedule myAcquisition
scipion3 project myAcquisition
where the first command creates the project named myAcquisition using the /path/to/your/workflow.json template, the second starts the processing of the myAcquisition project and the third opens the Scipion GUI to show the myAcquisition project.
Dynamic templates
Usually, we always must set the same parameters that are specific for each acquisition, such as deposition path, gain image path, dose per frame, particle size… Then, in order to avoid manually editing this parameters by opening every protocol in which belongs (using the procedure explained for the static templates in the previous section), Scipion has a mode to open modified templates in such a way that a wizard is launched asking for all that specific parameters, at once.
To see a demo of this, just run
scipion3 template
(scipion3 demo makes exactly the same than the command above)
This will pop up a small wizard like the one below
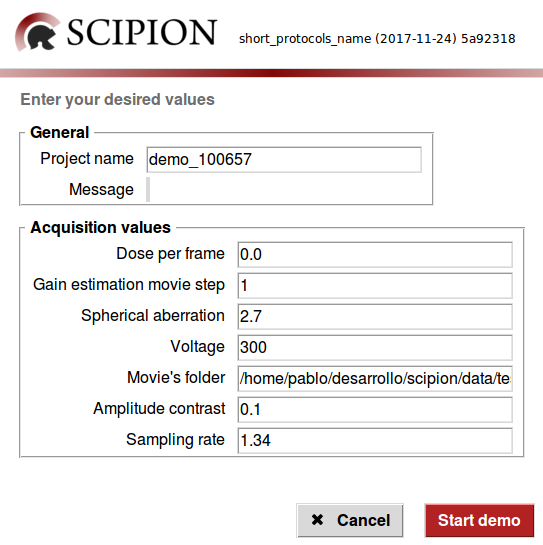
You can fill the form according to your data or just leave all the displayed fields untouched since it goes right with the test data (*see requirements below). As you click on the Start demo button, Scipion should appear with the new project loaded and running in streaming mode.
Import movies should already be importing files, whereas the rest should be scheduled. As soon as there is any input available for each protocol, that protocol will start processing it and making it available for the next protocol in line. Also, the Monitor summary should be monitoring the progress and generating an HTML report with the outcome of the data.
(*) Requirements for the demo:
To run the demo as it is, you need to install the following plugins
scipion-em-facilities
scipion-em-motioncorr
scipion-em-cistem
scipion-em-eman2
scipion installp -p scipion-em-facilities -p scipion-em-motioncorr -p scipion-em-cistem -p scipion-em-eman2
Notice that motioncor2 needs GPU acceleration.
In addition, the demo uses either the jmbFalconMovies dataset for v1.2-Caligula version or the relion13_tutorial dataset for later versions (also for devel branch). Thus, you can download the dataset that you need by
scipion testdata --download jmbFalconMovies relion13_tutorial
Creating custom dynamic templates
The dynamic template explained above is just an example, but you can create your custom dynamic templates according with your preferences, system requirements/availability… using static templates (explained in the previous section above) as starting points to create dynamic ones.
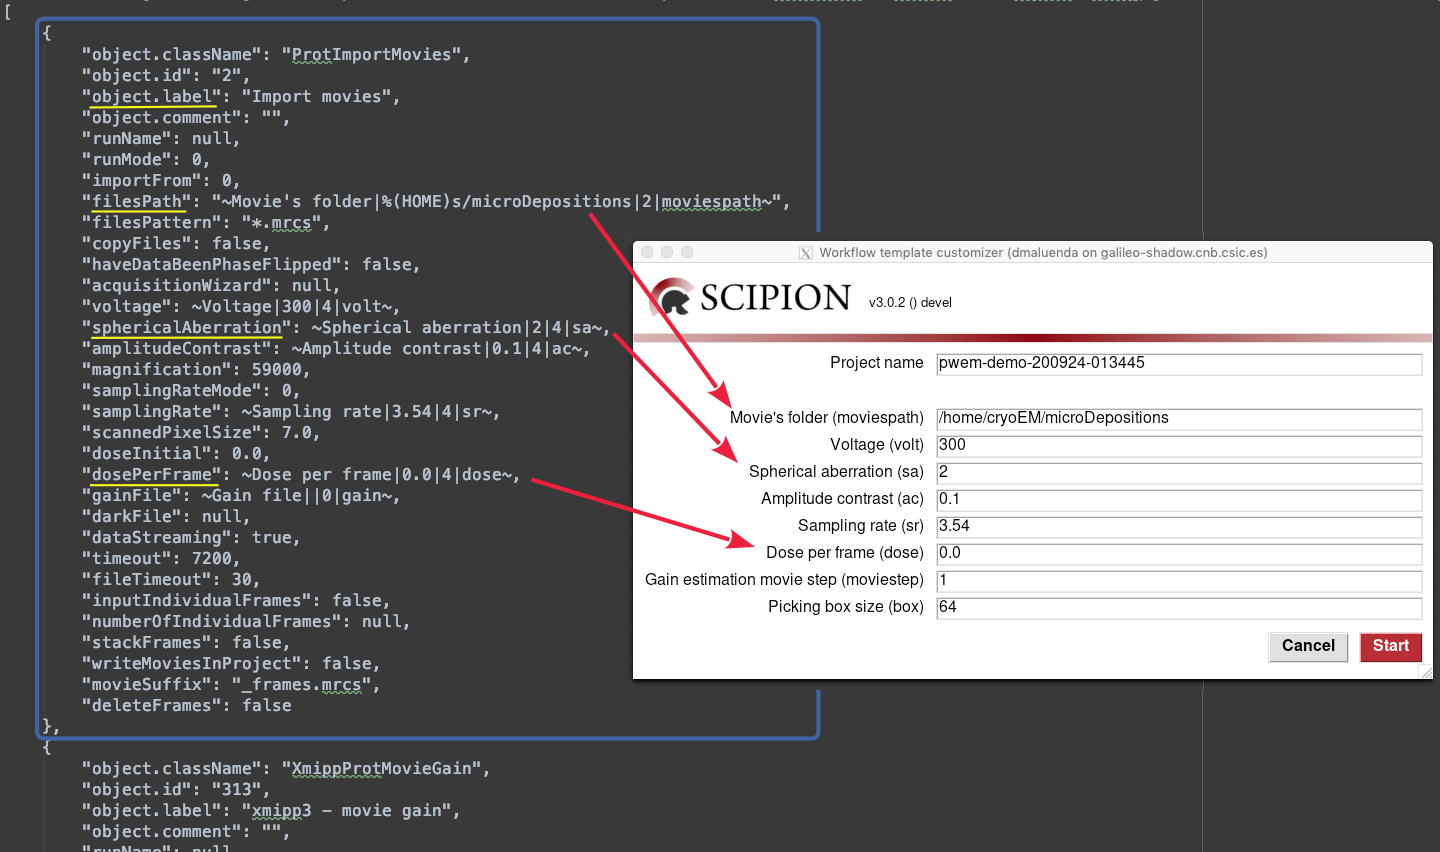
As we have seen, Scipion’s templates are JSON files, which are composed by a list of all the protocols in the workflow. In the figure below, we have highlight with a blue box the Import movies protocol block, where it has listed inside all its internal parameters, such as the label, the files path where to find the movies, the microscope’s spherical aberration, the dose per frame applied… (underlined in yellow)
In a common JSON file, all item are made of key:value pairs where key (what is before ‘:’) is always a string and the value (what is after ‘:’) can be a string (“something coated”), number, boolean (true or false), list, dictionary, null… (read more info about JSON files).
Notice that environ variables are allowed in any template parameter
by means of the %(VAR)s casting.
For instance, the %(HOME)s in the filesPath parameter
will be replaced with the $HOME environ variable at the launching time.
Additionally, we have created an easy syntax to add dynamic fields to that JSON file, which will fed the wizard showed in the previous section. Then, to add a dynamic field, you only must replace the value (what is after the ‘:’) of a certain parameter with a string starting and ending by ‘~’, enclosing four fields separated by ‘|’. That’s something like
anyField: "~label|defaultValue|typeValue|cmdId~"
where label is the field’s name displayed in the wizard form, defaultValue is the default value inserted in that wizard field and typeValue is a number which forces the type of the final value according to
0 for strings
1 for booleans
2 for paths
3 for integers
4 for floats.
Moreover, Scipion3 adds a new feature in order to be able to launch dynamic templates with a single command line using the optional fourth field (cmdId). See the next section below.
In the figure above, there are some examples such as filesPath, spherical aberration, amplitude contrast, sampling rate… (follow the arrows to see the behavior). In this case all them belongs to the same protocol. However there is no restriction in this way and, thus, you can add a dynamic field to any parameter of any protocol (and mixing them).
Notice that the type for the filesPath field is set to 2 (meaning path), then Scipion will check if this path exists before starting to process. Instead, gainFile is set to 0 (string) to allow an empty value to skip using a gain image if not needed. Finally, the 4 (float) set to the dosePerFrame allows to introduce non integer values.
When you are happy with the modified JSON file, you can save it wherever you consider and, then you can launch it with
scipion3 template /path/to/myDynamicTpl.json.template
However, if dynamic templates are saved in such a way like
$SCIPION_HOME/config/myDynamicTpl.json.template
(where $SCIPION_HOME is where you have installed Scipion), Scipion will
automatically discover them. This is: the extension of this files have to be
.json.template and it must be in the $SCIPION_HOME/config directory.
You can make as dynamic templates as you desire just by storing them in the
mentioned directory with a certain different file name
(as long as they finishes with .json.template).
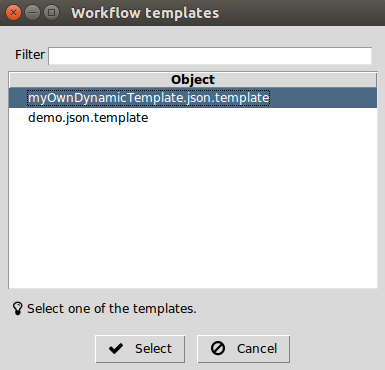
When more than one dynamic template are found in the
$SCIPION_HOME/config directory, the command
scipion template
opens an additional menu to allow choosing the dynamic template to use.
Launching dynamic templates from command line
The optional forth field in the dynamic templates (cmdId in the example above) is an identifier to assign a given value during a launch through the command line. Notice that the wizard reminds this identifier in brackets.
For instance, the following command
scipion3 template /path/to/myDynamicTpl.json.template sa=2 ac=0.1 dose=1.2
will load the /path/to/myDynamicTpl.json.template by parsing the
spherical aberration (sa), the amplitude contrast (ac) and
the dose per frame (dose) according to the passed values.
In addition, several parameters can share the same identifier. Then, the same value will be assigned when parsed during the launching.
If all dynamic parameters are parsed in the command line, then the workflow is automatically triggered. Instead, if some parameters remains unset, a wizard similar to that described in the previous section asks for them is launched.
The facilities tutorial describe more in deep how to launch dynamic templates from a single command line.
Using Scipion’s API
A Scipion’s project can be created, designed (adding protocols) and launched by a Python script using the Scipion’s API.
Go to API workflows to see in detail how to make projects with a Python script.