API scripting demo (Scipion2)
This tutorial try to put into practice the previous facilities sections by means of a demo which simulates a whole cryo-EM acquisition session.
This tutorial is intended to be follow using Scipion2
The demo is made of the following 5 logical steps:
Simulating a cryo-EM acquisition by taking movies from a data set to deposit it in a simulated deposition directory, one by one every a certain time step.
Launching a wizard asking for some parameters that the user can set.
Creating the workflow according to that user and config parameters.
Notice that these 5 steps are independent one each other. Moreover, each of them can be done in different ways and, this demo wants to be just an example of how to do them. However, we will give some hints of alternative procedures.
This demo uses a set of scripts from our em-facilities script-sharing repository, thus clone the repository to be able to run this demo
git clone https://github.com/I2PC/em-facilities
0. Config file
First of all, it is very useful to have a file where to store some parameters which usually remains constant for a certain configuration/system/PC/facility. We call this file config file.
For instance, the usingAPI-demo/scipionbox.conf file contains some constant parameters useful for this demo
[GLOBAL]
DEPOSITION_PATH = ~/microDepositions
PATTERN = *.mrcs
GAIN_PAT = gain.mrc
SCIPION_PROJECT = ~/ScipionUserData/projects
SIMULATION = True
RAWDATA_SIM = ~/ScipionUserData/testData/betagalMovies
NUM_CPU = 64

[MICROSCOPE]
AMP_CONTR = 0.1
SPH_AB = 2.7
VOL_KV = 300
SAMPLING = 0.637
TIMEOUT = 1*60
INV_CONTR = True
PARTS2CLASS = 3000
We can see two sections Global and Microscope getting the following parameters.
- Global:
DEPOSITION_PATH: Where Scipion will look for movies.
PATTERN: The bash pattern that all movies have to match to be imported.
GAIN_PAT: The bash pattern that the gain must match to be used (it must also be at the deposition path in this case).
SCIPION_PROJECT: Where to store the Scipion project.
SIMULATION: If
True, a simulation is performed by means of linking files from RAWDATA_SIM to DEPOSITION_PATH every certain time. IfFalse, no simulation is done and DEPOSITION_PATH is expected to be automatically full.RAWDATA_SIM: Where to find a data set to be used for the simulation (ignored if
Falsein the previous point).NUM_CPU: Number of system CPUs to optimize the workflow.
- MICROSCOPE:
AMP_CONTR: Amplitude contrast of the microscope.
SPH_AB: Spherical aberration of the microscope (in mm).
VOL_KV: Working microscope voltage (in kV).
SAMPLING: Sampling rate (in A/px).
TIMEOUT: General timeout for the streaming mode and, if SIMULATION is
True, the simulated acquisition rate (in s).INV_CONTR: If
Truea contrast inversion is done before picking. IfFalse, no inversion of contrast is done.PARTS2CLASS: Number of particles to wait before to perform a 2D classification of a first batch.
If you think that some of these parameters are not so constant, you could not include it and, then ask for it using a wizard or the option you consider. Also, here we have included some workflow dependent parameter such as the PART2CLASS. You are free to put more or less parameters here, just have in mind that they are parameters that rarely change from one acquisition to the next.
1. Acquisition simulation
This point is just to simulate a periodically getting of movies. Nothing else. If you intend to run in a real acquisition, you can skip this point.
The script usingAPI-demo/simulate_acquisition.py in the cloned repository
Usage: simulate_acquisition.py INPUT_PATTERN OUTPUT_FOLDER [GAIN_FILE] [DELAY]

        INPUT_PATTERN: input pattern matching input files.
        OUTPUT_FOLDER: where to create the output links.
        [GAIN_FILE, default None]: gain file will be linked at the beginning
        [DELAY, default 30]: delay in seconds between file appearance
makes symbolic links of those files matching INPUT_PATTERN to OUTPUT_FOLDER every DELAY seconds. If a GAIN_FILE is found, it is linked first.
2. Wizard for user parameters
Every acquisition have singularities from the others. That singularities can be from the sample type, from the user preferences, from the EM operator preferences, from the resources availability or, even, from the microscope status. Then, we should have some flexibility to process the sample, but first of all, we need to know this singularities.
In this demo, we have re-used the GUI code in Scipion for creating a wizard in order to ask for all these parameters that can be different from one acquisition to the other. However, every facility can develop its own way to retrieve these (or others) parameters, such as a web form, using the facilities booking system… We refer to that parameters as user parameters.
The code of this wizard can be found in usingAPI-demo/form_launcher.py in the cloned repository. We have design this script in four logical steps:
The wizard can be launched by running
scipion python em-facilities/usingAPI-demo/form_launcher.py
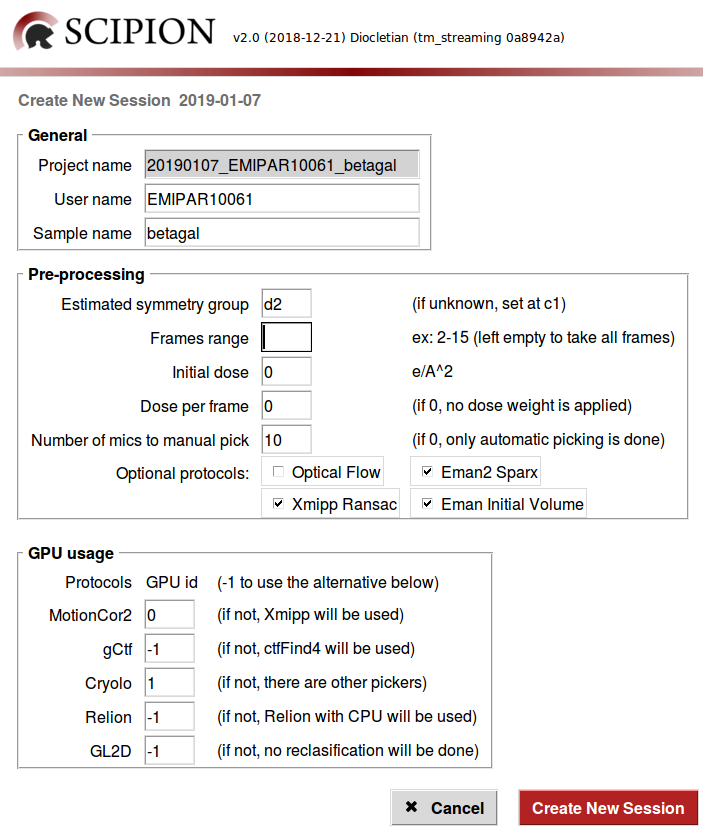
All the default values in the Pre-processing section (also in the scipionbox.conf) are thought to be used with the beta-galactosidase sample (EMPIAR 10061 dataset). However, you can play setting the parameters in some way or adjusting them to your single data.
For instance:
We know that this sample belongs to the
d2symmetry group and this will be used to estimate the initial model, however one can introduce any other symmetry group.This movies have 16 frames, thus you cat skip some of them by indicating a certain Frames range.
If a certain Number of mics to manual pick is set, the workflow will wait until this number is reached before launching the manual picker. If 0 is set, only automatic picking is done and the particle size is estimated by Xmipp.
We can add optional protocols, such as Optical flow to do a high order local movie alignment, Eman2-Sparx to automatic picking, or adding more initial volume reconstruction methods to the Xmipp swarm init. vol. consensus protocol, such as Xmipp Ransac and/or Eman Initial Volume. Note that Xmipp Significance is always used to estimate the initial model.
For the GPU usage section, note that all the protocols in the workflow will be running in parallel at the same time, then only one GPU id can be attached to one single protocol to prevent GPU concurrence crashes.
Now, we are able to start the processing over the simulation acquisition by clicking on Create New Session.
3. Creating custom workflows
Once we know all the parameters that will be used, we must create the workflow accordingly. At this point there are two options:
Fill a JSON file with all the protocols parameters accordingly with the previous section.
Use the Scipion’s API to create a new project and adding every protocol accordingly to the previous section.
You can code a script to fill a JSON file according to all what Scipion expect. Although, a good option to go with the JSON way is to choose a certain JSON file from a stored set of templates, according to the user answers.
However, in this tutorial we have choose to develop a Python script using the Scipion’s API to create the project and to add all the protocols according to the wizard described in the previous section.
See how to create workflows with the API to continue.
4. Launch and open projects
Launch a project
See launching JSON workflows if you crated a JSON file.
In case of API workflows, if the protocols included in the workflow made in the previous section are saved instead of launched, we must to launch the whole workflow at once by
scipion python $SCIPION_HOME/pyworkflow/project/scripts/schedule.py projectName
where projectName is the name of the project made in the previous section.
Alternatively, the whole workflow can also be launch from the GUI by selecting
the Import Movies > right-click > Restart workflow.
Note that if the protocols have been launched during the workflow creation, this step must be skipped.
Open a project
To open a project you can either open the Scipion GUI and choose the project from the project window or just run
scipion project projectName
5. Customize the HTML report
The HTML report can be customized to the facilities’ needs. It haven’t be customized every acquisition but just once. However, we include here how to customize the HTML report.