Creating tests for the calculator plugin
In this tutorial we explain how to write tests for a protocol, specifically for the calculator protocol writen in the previous tutorial.
Associated resources
Here you can find resources associated with this content:
Tutorial Data
If you already have scipion-em-template plugin installed in Scipion:
cd scipion-em-template/location
git checkout -b course1_ex6
Otherwise:
cd desired/location
git clone -b course1_ex6 https://github.com/scipion-em/scipion-em-template.git
cd scipion3/location
./scipion3 installp -p scipion-em-template/location --devel
Test Dataset
First of all, a test can use a dataset or not, depending on the test design/needs. A dataset is a predefined batch of files that your test needs to load in order to launch your protocol (e.g. a micrograph mrc file for the import micrographs protocol test) or to feed some of your protocol inputs (e.g. a coordinates file or/and a tomogram file).
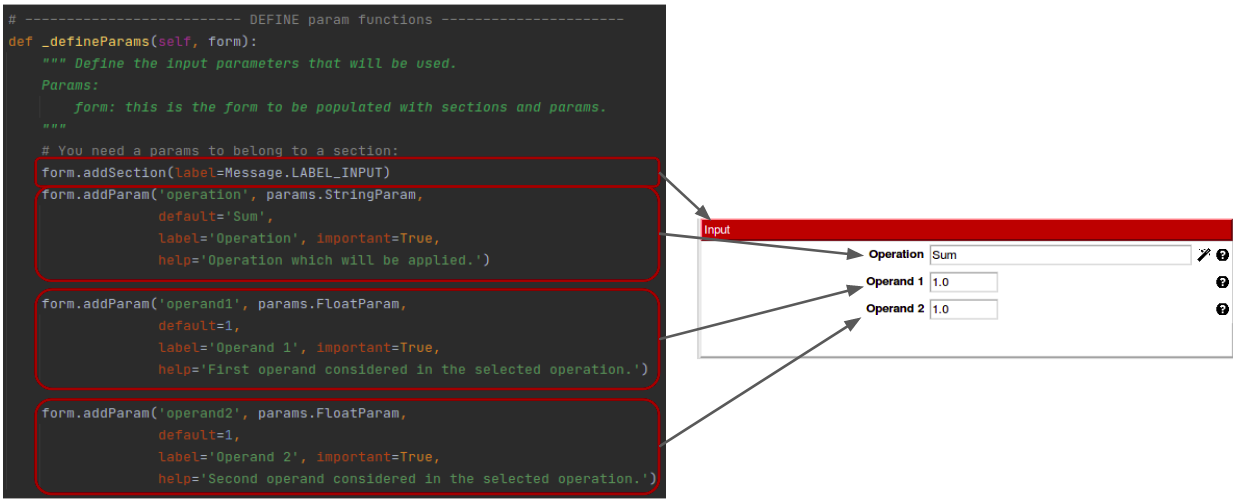
For the protocol which is going to be used in this tutorial, we use a basic calculator with three required inputs: operation, which can be chosen from a list of four options (Sum, Subtract, Multiply and Divide) and two numeric operands. The figure below shows how the protocol GUI looks like and the corresponding protocol code:
Thus, this protocol doesn’t need any dataset, because the data required are just a string (operation) and two floats (the operands). Nevertheless, a simple dataset has been created for these tests in order to illustrate how to work with it if needed.
The dataset consists of a directory named devCourse, which contains a subdirectory named calculator (other subdirectories or even other datasets can be generated to satisfy the different protocols’ tests data requirements), in which there are two text files:
operand1: contains only one line with number 12.
operand2: the same but with number 3.14159265359.
They will be read and parsed in the tests to generate the required operands.
Where are datasets located?
All the datasets are stored in directory [SCIPION_HOME]/data/tests. Existing datasets will be downloaded there.
Create a dataset
To begin the practice, the dataset described above must be created in the expected location.
Associate datasets to plugin tests
Datasets must be declared in file __init__.py located in the tests folder. Thus, the first step will consist of creating the test directory inside the plugin directory and the corresponding __init__.py file. The following code shows how it should be done.
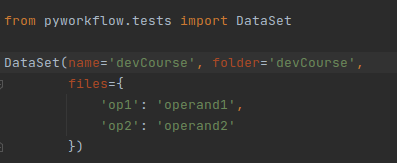
Observe that the name and folder attributes have the same value. This is because in this case the dataset and
the main folder have the same name. On the other hand, attribute files is used to have direct access to specific
files inside the dataset via DataSet method getFile.
Writing the tests
In the tests folder, create a file named test_protocol_myCalculator.py, and open it.
Create a test class named TestProtocolMyCalculator inheriting from BaseTest from pyworkflow.tests.
Inside that class, create a method to prepare the test execution environment. It has to be named setUpClass and it has to:
3.1 Set up the test project (Hint: method setupTestProject in pyworkflow.tests).
- 3.2 Get from dataset devCourse files operand1 and operand2 and parse them to get the actual values.
They must be two floats, one per file (12 and 3.14159265359, respectively).
3.3 Store operand1 value in a class attribute named cls.op1 and do the same for operand2 with cls.op2.
Write four tests, one for each operation offered by the calculator protocol (Sum, Subtract, Multiply and Divide). Each test must:
4.1 Create a calculator protocol object with the attributes operation, operand1 and operand2.
Hint: To do that, check BaseTest method newProtocol.
4.2 Execute the protocol created.
Hint: use method launchProtocol from BaseTest.
4.3 Get protocol output. It is stored in a protocol attribute named result.
- 4.4 Validate the value obtained. To do that, create an assertion, e. g. assertTrue from BaseTest.
The validation has to check if the result obtained is different from the expected with a tolerance of 1e-6.
Note
do not hesitate to write as many auxiliary methods for code centralization
Note
it is recommended to create a file constants.py inside the plugin and declare there the operation names for the calculator.
Executing the tests
To run the tests, first go to the Scipion3 folder.
If you want to execute all tests contained in your python file:
./scipion3 tests myplugin.tests
If you want to execute a group of tests contained in a specific test
class (there can be more than one), in our case test_protocol_myCalculator:
./scipion3 tests myplugin.tests.test_protocol_myCalculator
If you want to execute only one test from a specific test class inside the file, e.g, testMultiply:
./scipion3 tests myplugin.tests.test_protocol_myCalculator.testMultiply
If using the first option, the result should look like this:
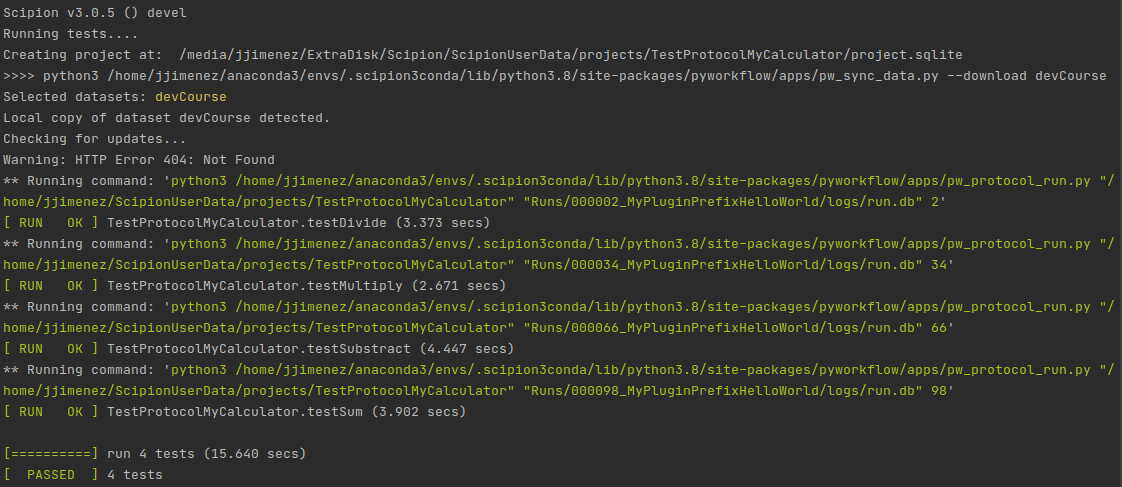
Note that Scipion looks for the specified dataset. If it is not found on you local PC, it is downloaded from a server.
Display the test project
Each test class generates a project in Scipion3 with the same name. In our case it will be named TestProtocolMyCalculator. All protocols created within the same class share the same project. To check that, execute in a terminal from Scipion3 directory:
./scipion3 last
Which will automatically open the last modified project. You should see the following:
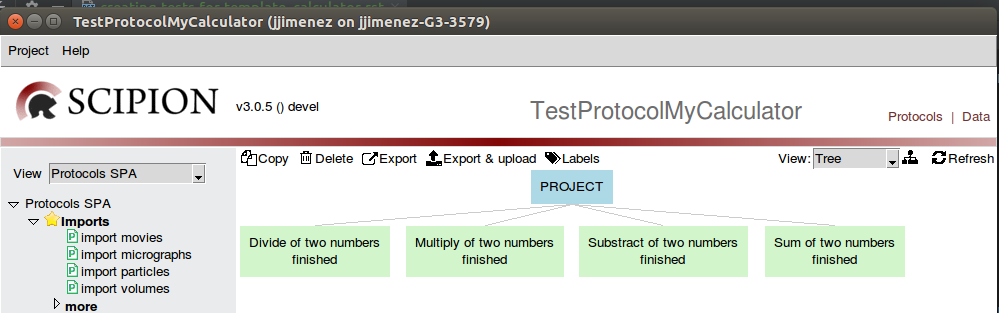
Note that there is one protocol box per test. They can be directly labelled from the test using protocol method setObjLabel.
Solution
To get the tutorial solution, simply move to the branch specified below:
cd scipion-em-template/location
git checkout -b course1_test