Creating a workflow template
Associated resources
Here you can find resources associated with this content, like videos or presentations used in courses:
Scipion can export a workflow or a series of protocols into a file.
A Scipion workflow file contains all the attributes for each protocol
selected in the project window. This file can then be used to create a new
project.
This workflow file can be customized to ask user for some values before creating the project.
Cloning and installing scipion-em-template
If you are following a course you might already have done this. This practice starts from the master branch.
cd desired/location
git clone https://github.com/scipion-em/scipion-em-template.git
cd scipion3/location
./scipion3 installp -p scipion-em-template/location --devel
Exporting a workflow
When you have a workflow, its protocols can be selected by Ctrl-click on
each one. When you have more than one protocol selected, in the Scipion options
bar, Export option will appear as shown in the following figure:

Important
For the Export option to appear, more than one protocol box must be selected.
After that you will be able to choose the path where you can store the file, as well its name.
Important
The file extension must be json.template and it must be stored in myplugin/templates.
Scipion’s templates are JSON files (read more about JSON files here).
    [
    {
        "object.className": "MyPluginPrefixHelloWorld",
        "object.id": "2",
        "object.label": "myplugin - Hello world",
        "object.comment": "",
        "_useQueue": false,
        "_prerequisites": "",
        "_queueParams": null,
        "runName": null,
        "runMode": 0,
        "message": "Hello world!",
        "times": 10,
        "previousCount": 0
    },
    {
        "object.className": "MyPluginPrefixHelloWorld",
        "object.id": "84",
        "object.label": "myplugin - Hello world (2)",
        "object.comment": "",
        "_useQueue": false,
        "_prerequisites": "",
        "_queueParams": null,
        "runName": null,
        "runMode": 0,
        "message": "Hello world!",
        "times": 10,
        "previousCount": 0
    },
    {
        "object.className": "MyPluginPrefixHelloWorld",
        "object.id": "118",
        "object.label": "myplugin - Hello world (3)",
        "object.comment": "",
        "_useQueue": false,
        "_prerequisites": "",
        "_queueParams": null,
        "runName": null,
        "runMode": 0,
        "message": "Hello world!",
        "times": 10,
        "previousCount": 0
    }
]
Launching the template
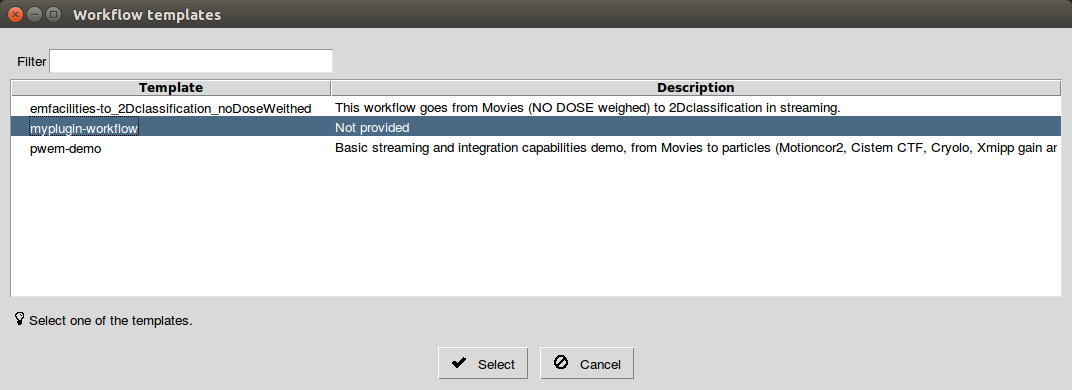
Scipion uses a specific command to discover the templates. It searches for files in both [SCIPION_HOME]/config folder as well as plugin/templates and displays a list of found templates.
./scipion3 template
The following window appears once the command above is executed.
Note
Here you can select a template which will appear as follows:
plugin name - template name. Also note that the template does not
have any description. Later we will explain how to add it.
After selecting the template, a window will appear allowing you to execute it.
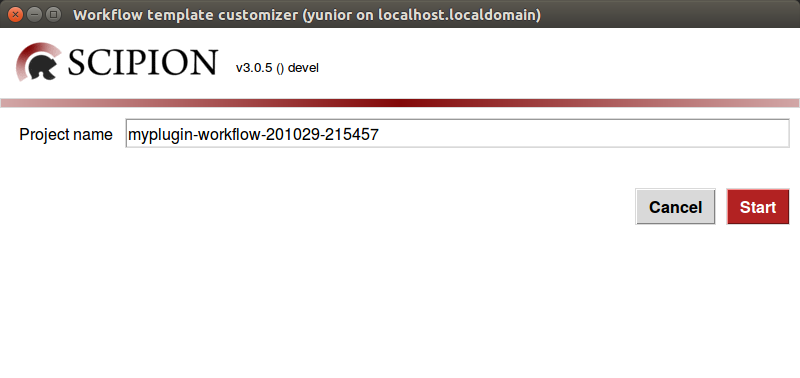
After clicking the Start button a project will be generated with the
protocols inside the template and all of them will be scheduled as shown in the
figure below:

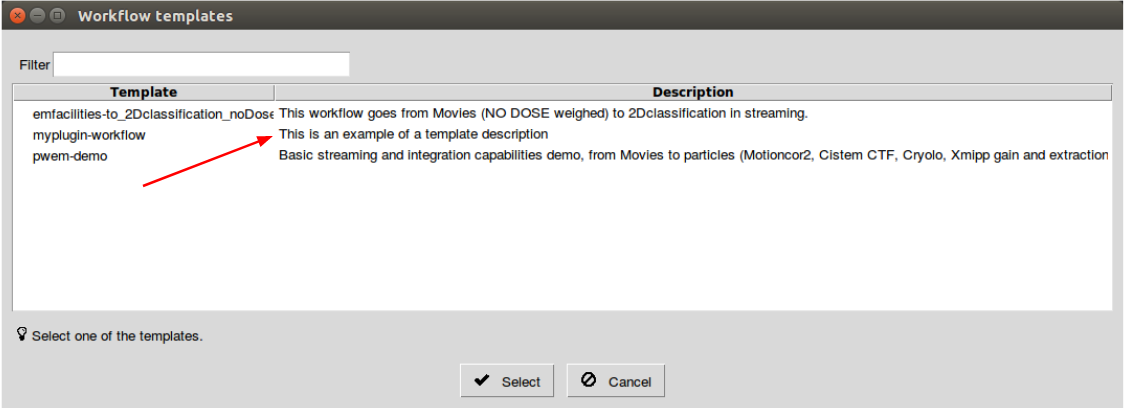
Adding a description
In order to add a template description, add it to the top of the template file.
This is an example of a template description
[
{
    "object.className": "MyPluginPrefixHelloWorld",
    "object.id": "2",
    "object.label": "myplugin - Hello world",
    "object.comment": "",
    "_useQueue": false,
    "_prerequisites": "",
    "_queueParams": null,
    "runName": null,
Adding dynamic fields
In some cases you may need to ask the user for certain values before creating
and launching the project such as movie’s path, sampling rate, dose etc.
In our example we want to ask for the Message and the Time parameters.
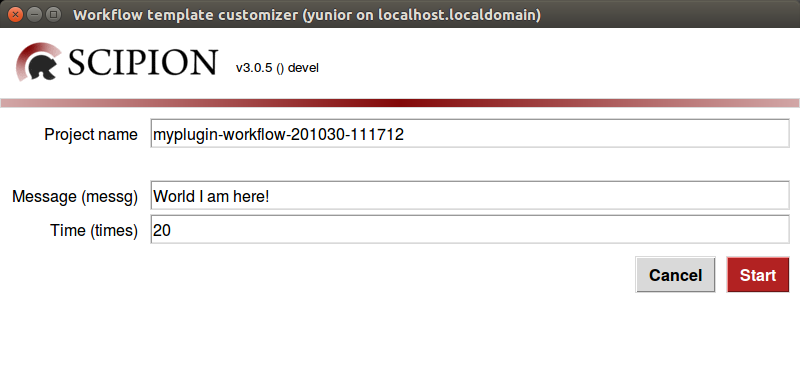
You can find more details about how the dynamic fields syntax works here.
Now you can provide the values for these dynamic parameters directly from the command line, e.g. below Message and Time dynamic parameters were defined as arguments:
./scipion3 template "myplugin-templatename" msg="TEST" time=10
Once you are done, run it and check if Scipion asks for the right values, the project created works and has the expected parameters.