Creating a protocol
In Scipion, we define Protocol as a processing task that involves the
execution of several steps. Each step can execute Python code or call
external programs to perform specific sub-tasks. When designing a new
protocol, we should provide a clear definition of the protocol inputs
and outputs. The developer of a protocol also needs to take care of
necessary conversions between Scipion-objects to the program files and
parameters. Moreover, the results of the protocol execution should be
registered back as output in the form of Scipion-objects.
We are going to use a 2D classification protocol (maximum likelihood in Xmipp) as an example to illustrate the development of a new protocol. This small guide will cover the basics of creating a new protocol. In each section, we will provide links to more detailed information when needed.
Table of Contents
Protocol Definition: overview
Name and inheritance
The first step when developing a protocol is to select the protocol
class name. In this case, it is XmippProtML2D, following the
convention that all Xmipp protocol names will start with XmippProt (we
recommend a similar approach to name protocols from other EM plugins).
In this case, our protocol descends from a base class ProtClassify2D
which reflects the operation that this protocol performs. The list of protocols and
how they interact with each other can be observed on the
:doc:`Scipion EM classes - fig. general EM protocols hierarchy <scipion-em-classes>. The corresponding files
are located in pwem/protocol.
Help icon message customization
The Python documentation string following the protocol class line will
serve as help for users. It is very useful to provide a short but
descriptive help message that will quickly give users a sense of
the protocol’s function. If the protocol defines a _label class
property (ml2d in this example), it will be used as a label to display the protocol in
menus. If not provided, the protocol class name will be used, but this
name is probably less meaningful to final users.
Protocol development status definition
Protocols define the variable _devStatus which represents the
development status. By default, it defines it as production mode, but it can be
modified as BETA or NEW. These values can be imported from the pyworkflow
package as shown below:
from pyworkflow import PROD, BETA, NEW
Structure of a protocol class
The protocol initialization function should receive the
keyword-arguments ( `*kwargs ). The arguments should also be passed
to the base class initialization method. This function is the right
place to make variable initialization or similar things.
...
from pyworkflow import BETA
...

class XmippProtML2D(ProtClassify2D):
    """
    Perform (multi-reference) 2D-alignment using
    a maximum-likelihood ( *ML* ) target function.
    """
    _label = 'ml2d'
    _devStatus = BETA

    def __init__(self, **kwargs):
        pass

    #--------------- DEFINE param functions ---------------

    def _defineParams(self, form):
        pass

    #--------------- INSERT steps functions ----------------

    def _insertAllSteps(self):
        pass

    #--------------- STEPS functions -----------------------

    def convertInputStep(self):
        pass

    def runMLStep(self, params):
        pass

    def createOutputStep(self):
        pass

    #--------------- INFO functions -------------------------

    def _validate(self):
        return []

    def _citations(self):
        return []

    def _summary(self):
        return []

    def _methods(self):
        return []

    #--------------- UTILS functions -------------------------

    ...
The code above illustrates the skeleton of a protocol class. There are five main parts of the code:
Parameter definition: Defines all the parameters that will appear in the GUI and that will be attributes of the protocol instance.
Steps list: Prepares the list of steps that will be executed in order to complete the protocol.
Steps functions: Contains the code that will be executed (Python code or calls to external programs)
Validation and info functions: Decorates the protocol class by providing parameter validation and some useful information to the user.
Other utils functions: Varies from protocol to protocol; it will contain helper functions to be used throughout the protocol code.
In the following sections, we are going to thoroughly explain each of these parts in order to develop a fully functional protocol.
Parameter definition
In the _defineParams(form) method, the protocol’s form will be
populated with the input parameters, which also will be rendered
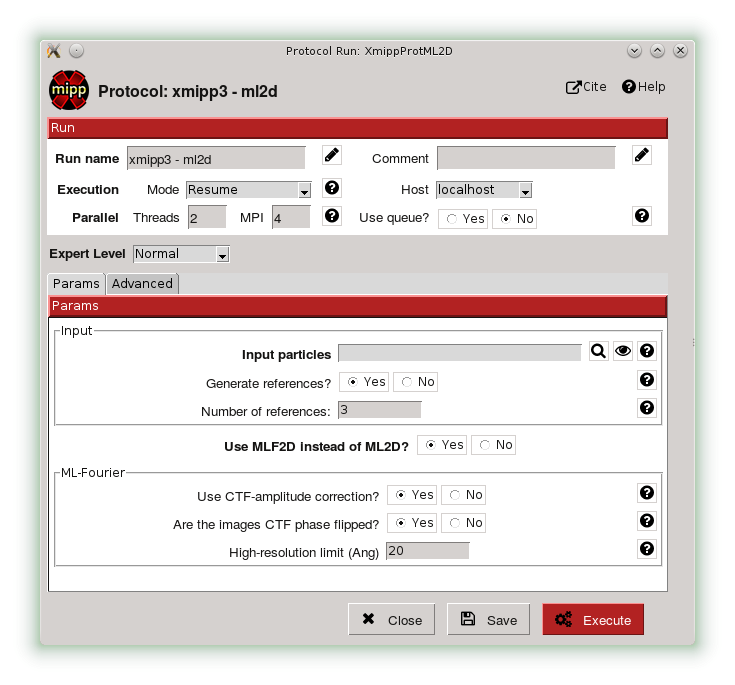
graphically. Regarding the protocol corresponding GUI, Scipion provides a base
protocol graphic interface which corresponds approximately with the upper half of
the image below. Then, the graphical components are dynamically added as
they are defined by the user (explained below).
All these parameters will be available as the protocol’s attribute that can be used in the protocol steps. Moreover, they should have a unique name inside the protocol and a type (from among the ones defined in Scipion framework). There are two groups of parameters:
- Simple parameters: Basic input parameter types.
StringParam: A basic string input (a textbox in the GUI)FloatParam: Floating point input value (a textbox in the GUI, but should have a floating point format)IntParam: An integer (a textbox in the GUI, but should have an integer format)BooleanParam: A boolean value, or True or False (a Yes/No question in the GUI)EnumParam: Also an integer input, but with a small number of possible choices (a combobox or a list in the GUI)
- Complex parameters:
PointerParam: Selects objects from the database (a text box with a search button in the GUI)RelationParam: similar toPointerParam, but will select relationships instead of objects (mainly used for CTF browsing)ProtocolClassParam: similar toPointerParam, but will select protocol classes (used for Workflows, under development)
Parameters can be added with the
form.addParam(paramName, paramClass, **kwargs) method. paramClass
should be one of the classes listed above and the `*kwargs are passed to
the constructor. Valid options in the `*kwargs dictionary are:
default : Default parameter value
condition : A string representing an expression (whose values are substituted later) that determines whether the parameter appears.
label : A label message that will be displayed in the GUI
help : Usually a more extended help message that will pop up after clicking on a help icon.
choices : A list of strings with the display values for the combobox ( Only valid for
EnumParam)display : can be
EnumParam.DISPLAY_LISTorEnumParam.DISPLAY_COMBO, and defined the preferred display mode for GUI.( Only valid forEnumParam)pointerClass : Class of the objects that will be selected from the database ( Only valid for
PointerParam)pointerCondition : A string expression to filter the selected objects from the database (such as
aligned=True, Only valid forPointerParam)allowsNull : A boolean. If true, this parameter is not required ( Only valid for
PointerParam)
To improve the organization of the input parameters, they can be grouped into sections, groups, or lines.
Section: The function
addSectionwill create a new section (that will be visualized as a new tab in the GUI), and all further calls toform.addParamwill add parameters to that section.Group: The function
addGroupwill return aGroupobject that can also add parameters to it. The group will be displayed as a labelled frame in the GUI.Line: Another way of grouping is through
addLine(lineLabel), which will return aLineobject that can also contain other parameters. It will simply display those parameters in the same row.
def _defineParams(self, form):
    form.addSection(label='Params')
    group = form.addGroup('Input')
    group.addParam('inputParticles', PointerParam,
                   pointerClass='SetOfParticles',
                   label="Input particles", important=True,
                   help='Select the input images from the project.')
    group.addParam('doGenerateReferences', BooleanParam, default=True,
                  label='Generate references?',
                  help='If you set to *No*, you should provide references images'
                       'If *Yes*, the default generation is done by averaging'
                       'subsets of the input images. (less bias introduced)')
    group.addParam('numberOfReferences', IntParam, default=3,
                  condition='doGenerateReferences',
                  label='Number of references:',
                  help='Number of references to be generated.')
    group.addParam('inputReferences', PointerParam,
                  condition='not doGenerateReferences',
                  label="Reference image(s)",
                  pointerClass='SetOfParticles',
                  help='Image(s) that will serve as initial 2D references')

    form.addParam('doMlf', BooleanParam, default=False, important=True,
                  label='Use MLF2D instead of ML2D?')

    group = form.addGroup('ML-Fourier', condition='doMlf')
    ...
    form.addParallelSection(threads=2, mpi=4)
The line form.addParallelSection(threads=2, mpi=4) specifies the number of threads and MPI that will be used by default in this protocol. If not set, both thread and MPI are equal to 1. Setting thread or MPI with a 0 value here will mean that it is not possible to use it and will be hidden in the GUI. More about the parallelization of protocols can be found in Parallelization<protocol-parallelization.
The above definition will generate a desktop GUI as shown in the following figure:
Defining Steps
Another important function is _insertAllSteps, in which the steps
that will be executed when the user clicks on pushbutton Execute of the protocol GUI are defined.
This function is only invoked before a protocol starts to run and the following actions take place:
The method
protocol.run()is calledThe
protocol._insertAllSteps()is called and a list of steps is populated (depending on the current parameters selection)The steps list is compared with previous steps lists in the database (if exists a previous execution) and,
If in RESUME mode, it will try to continue from the last step that was completed successfully. (In RESTART mode it will start from the first step and the output directory is cleaned)
It is important to note that no computing tasks should be performed in the _insertAllSteps
function this should be done in the steps; see next section). This place is only to DEFINE
what needs to be done, not actually to do it.
The Step class represents the smallest execution unit that composes a
Protocol. The most used sub-classes of Step are:
FunctionStep : Inserted using the function
protocol._insertFunctionStep. Any accessible function can be inserted; it could be a function of the protocol or an external function. The changes in the parameters passed to the function are used to detect step changes, so even when it may not be necessary to pass certain parameters, it is useful to pass them for detecting changes.RunJobStep : this step wraps a call to an external program and builds the necessary command line arguments. It can be inserted using
protocol._insertRunJobStep
In our example protocol, the _insertAllSteps function looks like:
def _insertAllSteps(self):
    self._insertFunctionStep('convertInputStep',
                             self.inputParticles.get().getObjId())
    program = self._getMLProgram()
    params = self._getMLParams()
    self._insertRunJobStep(program, params)
    self._insertFunctionStep('createOutputStep')
This is a relatively simple case (but also a common one) in which only three
steps are inserted: convertInputStep, runJobStep,
createOutputStep. In this case, the steps run in the same order
in which they were inserted, but it is also possible to define a more complex
dependency graph between steps that can be executed in parallel (through
threads or MPI). You can read more about defining steps to be executed
in parallel in Parallelization.
Even when a protocol runs its steps without parallelization, one a particular step can take advantage of a multiprocessor and use MPI or threads in a particular program command line.
Steps execution
Converting Inputs
It is common that one of the first steps in a protocol is
convertInputStep, whose main task is to convert from input Scipion
objects to files with the format that is appropriate for running a
particular program. In our example, we should convert the input
SetOfParticles object into the metadata star file that is required
by all Xmipp programs that operate on particles. In this classification
protocol, it is also possible to provide a set of reference images.
This is also taken into account in the convertInputStep function and
also writes metadata for the references if needed.
def convertInputStep(self, inputId):
    """ Write the input images as a Xmipp metadata file. """
    writeSetOfParticles(self.inputParticles.get(),
                        self._getFileName('input_particles'))
    # If input references, also convert to xmipp metadata
    if not self.doGenerateReferences:
        writeSetOfParticles(self.inputReferences.get(),
                            self._getFileName('input_references'))
The writeSetOfParticles function iterates over each individual image
in the input SetOfParticles and adds a line to a valid STAR file
using the Xmipp MetaData class in Python. By the same logic, any other
file format could be generated when writing a convertInputStep
function. Read more about iterating over a SetOfParticles and
querying its attributes in Using Sets.
Executing Programs
The second step function in this example is a runJobStep. In this
case the program is xmipp_ml_align2d (or mlf in the Fourier case). The
command line argument for calling the program is prepared in the
_getMLParams function.
def _getMLParams(self):
    """ Mainly prepare the command line for call ml(f)2d program"""
    params = ' -i %s --oroot %s' % (self._getFileName('input_particles'),
                                    self._getOroot())
    if self.doGenerateReferences:
        params += ' --nref %d' % self.numberOfReferences.get()
        self.inputReferences.set(None)
    else:
        params += ' --ref %s' % self._getFileName('input_references')
        self.numberOfReferences.set(self.inputReferences.get().getSize())

    ...

    if self.doMirror:
        params += ' --mirror'

    if self.doNorm:
        params += ' --norm'

    return params
As you can see, this function will concatenate the arguments passed to the program in the command line. The arguments will vary depending on the current selection of input parameters in the Scipion GUI. The same approach can be followed when executing a program from any other software package.
If we take a look at the output logs files after executing this protocol, we can see a command line similar to the following:
mpirun -np 2 -bynode `which xmipp_mpi_ml_align2d`
-i Runs/000194_XmippProtML2D/tmp/input_particles.xmd
--oroot Runs/000194_XmippProtML2D/ml2d_ --ref Runs/000194_XmippProtML2D/tmp/input_references.xmd
--fast --thr 2 --iter 3 --mirror
Creating Outputs
At the end of a protocol execution, we want to register the results in
the Scipion project. This is the function of the createOutputStep
method. It is the inverse operation of the
convertInputStep. It should read the files produced by the
protocol and create the Scipion objects that represent the output of the
protocol. It should also define the relationship between the newly created
output objects and the input.
In our case, the result of the protocol is a SetOfClasses2D, which
is created by the following code:
def createOutputStep(self):
    imgSet = self.inputParticles.get()
    classes2DSet = self._createSetOfClasses2D(imgSet)
    readSetOfClasses2D(classes2DSet, self._getFileName('output_classes'))
    self._defineOutputs(outputClasses=classes2DSet)
    self._defineSourceRelation(imgSet, classes2DSet)
    if not self.doGenerateReferences:
        self._defineSourceRelation(self.inputReferences.get(), classes2DSet)
Here the job is done by the functions _createSetOfClasses2D and
readSetOfClasses2D. The first one creates an empty set of
classes, while the second is specific to Xmipp and populates the set
reading the classes’ information from the Xmipp metadata outputs (STAR
files). More information about creating Scipion sets objects can be
found in link:UsingSets[Developers - Using Sets].
Although the creating output step is normally specific to each protocol, some common cases are populating the empty object with data read from the generated output, as explained in the previous paragraph, or, if the input and output objects are of the same type, use them to fill the output empty object and update the corresponding attributes, like the image filename, for example.
A good help for a better understanding of how to define the outputs generated as Scipion objects are:
Definitions are located in $SCIPION_HOME/pyworkflow/em/data.py
Once the outputs have been correctly created as Scipion objects, it is necessary to specify them
as outputs, which can be done using the method _defineOutputs. Finally, the relation or transformation
between the source and the destination objects should be defined. This can be carried out with methods
_defineSourceRelation, _defineTransformRelation or _defineCtfRelation, depending on the
objects implied in the protocol.
Additional Functions (optional)
There are some functions that not are strictly required when implementing a protocol. Nevertheless, they can provide useful information to the final user. All these functions will return a list of strings, whose meaning is different in each case.
Input validations and Warnings customization
The _validate and _warnings methods will be called just before a
protocol is executed. Both could return a list of string messages,
meaning that are some errors (or possible errors) in the input
parameters. If the returned list is empty means that everything is fine
and the protocol can run. The _warnings will show the messages to
the user but give it the choice to continue or not. If there are errors
from the ``_validate``, the protocol will not run. This can save time
for users because prevent simple errors that can be critical for the
protocol to run properly.
In our example, the _validate function is very simple. It checks that
the input particles have a CTF estimation if using maximum likelihood
in Fourier space. The _warnings method can be implemented in a
similar way.
def _validate(self):
    errors = []
    if self.doMlf:
        if not self.inputParticles.get().hasCTF():
            errors.append('Input particles does not have CTF information.\n'
                          'This is required when using ML in fourier space.')
    return errors
Citations, Summary and Methods
The _citations function is the way to provide references to the
methods used in the protocols. The returned list should contain the
keys of the citation reference. All the references for a specific
software package are listed in Bibtex format in a file called
bibtex.py. Read more about this file in this guide to
create a plugin.
In this case, there is a reference for the whole protocol and some extra
references are added depending on whether some variants are activated. The
citation will be displayed in the GUI as links to each publication. They
can be shown using the ![]() from the protocol
header in the form GUI or in the project windows in the Methods tab of
the selected protocol.
from the protocol
header in the form GUI or in the project windows in the Methods tab of
the selected protocol.
def _citations(self):
    cites = ['Scheres2005a']

    if self.doMlf:
        cites.append('Scheres2007b')

    elif self.doFast:
        cites.append('Scheres2005b')

    if self.doNorm:
        cites.append('Scheres2009b')

    return cites
The _summary function should provide a quick overview of a particular
protocol execution. It should check whether the protocol has not
finished its execution yet or, when finished, it has to provide some
brief information about the steps performed, outputs, quality, or any
other relevant information.
def _summary(self):
    summary = []
    nParticles = self.inputParticles.get().getSize()
    nReferences = self.numberOfReferences.get()
    summary.append('Number of input images: *%d*' % nParticles)
    summary.append('Classified into *%d* classes' % nReferences)

    if self.doMlf:
        summary.append('- Used a ML in _Fourier-space_')
    elif self.doFast:
        summary.append('- Used _fast_, reduced search-space approach')

    if self.doNorm:
        summary.append('- Refined _normalization_ for each experimental image')

    return summary
The _methods function should be implemented in a way similar to
_summary but should provide more descriptive information about the
execution. The text should be thorough enough to be used as a template for
a _Materials and methods_ section of a paper.
Extra Actions
These should be done while developing and testing your protocol, not at the very end of the process.
Make the protocol available
The protocol classes that are available in Scipion are discovered dynamically using Python reflection tools. So, when a new protocol class is added, it is automatically available to the whole system.
Manage protocol location in the protocol tree:
If you want your protocol to appear in a specific position in the protocol tree in the left pane of the projects GUI, you may need to do some configuration setup. This is performed with the protocols.conf file.
Writing Tests for Your protocol
Writing tests is the best way to develop from the beginning. It will help to cover different use cases of your functions (or protocols in this case). If they are run automatically, they will help to detect bugs introduced in future changes.
Here is the test for this protocol:
class TestXmippML2D(TestXmippBase):
    """This class check if the protocol to classify with ML2D
       in Xmipp works properly.
    """
    @classmethod
    def setUpClass(cls):
        setupTestProject(cls)
        TestXmippBase.setData('mda')
        cls.protImport = cls.runImportParticles(cls.particlesFn, 3.5)

    def test_ml2d(self):
        print "Run ML2D"
        protML2D = self.newProtocol(XmippProtML2D,
                                   numberOfReferences=2, maxIters=3,
                                   numberOfMpi=2, numberOfThreads=2)
        protML2D.inputParticles.set(self.protImport.outputParticles)
        self.launchProtocol(protML2D)

        self.assertIsNotNone(protML2D.outputClasses, "There was a problem with ML2D")
Implement a Viewer
The Viewer class is the base for implementing visualization of
different kinds of objects. The same applies to visualizing protocols. The
viewers are also discovered dynamically like the protocols are. They should
specify a _target property with a list of the object classes that the
viewer is able to handle.
The details for developing a new viewer will be described in How to develop Viewers.